In the world of digital art and animation, Blender has become a go-to software for creating stunning visual effects. One such captivating effect is the procedural dissolving effect. This technique allows objects to disintegrate or fade away in a controlled and visually appealing manner. Whether you’re working on animations, game assets, or visual effects for films, mastering procedural dissolving effects can significantly enhance your creative projects. In this blog, we will explore what procedural dissolving effects are, how they work, and how you can create them in Blender.
What is Procedural Dissolving Effects?
A procedural dissolving effect involves the gradual disintegration or fading of an object, often used to depict objects breaking down, characters teleporting, or transitioning between scenes. Unlike static dissolving effects, procedural dissolving effects are generated algorithmically, offering more control and variation in the dissolution process.
Why Use Blender?
Blender, with its powerful shader nodes and animation tools, is an ideal platform for creating procedural effects. The flexibility and control offered by Blender’s node-based system make it a favorite among digital artists for crafting intricate visual effects.
Procedural Dissolving Effects in Blender Tutorial
Let’s walk through the steps to create a procedural dissolving effect in Blender, using shaders and an Empty object for animation.
The process of creating a procedural dissolving effect in Blender
Start with the 3D model you want to dissolve. This could be anything from a simple cube to a complex character model. Ensure your object is properly UV unwrapped to allow for accurate texturing.
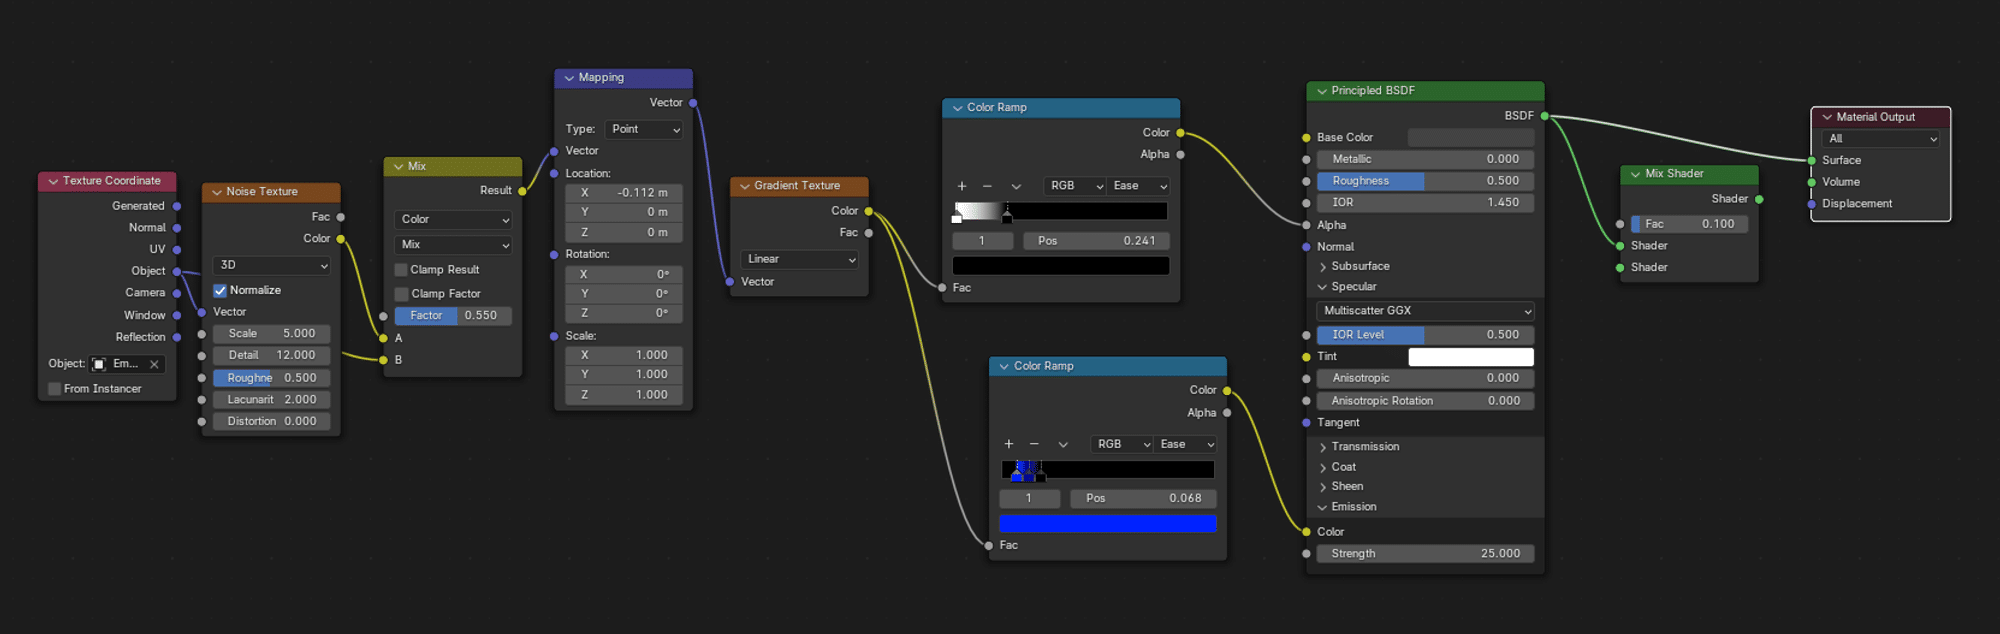
Step 2 - Open the Shader Editor
Switch to the Shader Editor in Blender. Create a new material. Add a mix shader node to blend between the object’s original shader and a transparent shader. Add a Color Ramp node to alpha in Principal BSDF, one for the transparency and second for color. Now add Texture Coordinate and Noise Texture this serve as the basis of what we want dissolving pattern, add Mapping node serve value as per want, This will help control the transition of the dissolution. Add a Mix Converter and play to the factor value. Now add a Gradient Texture connect to both color ramp that will show an effective material. Connect the Gradient Texture node’s output to the Color Ramp’s input.
Step 3 - Using an Empty to Control the Dissolve
Add an Empty In Object Mode, add an Empty (e.g., Empty Plain Axes) to your scene. Position it near your object. In the Shader Editor, add a Texture Coordinate node. This will allow you to use the Empty’s position to control the dissolve.
Step 4 - Animate the Empty
Select the Empty and go to the Timeline. Insert keyframes for the Empty’s position at the start and end of the dissolve animation. Adjust Keyframes Move the Empty along its path, adding keyframes to control the progression of the dissolve effect over time.
Tips for Creating Stunning Dissolving Effects:
Try using different types of procedural textures, like Voronoi or Musgrave, to achieve unique dissolving patterns.
Adjust the keyframes and easing of the Color Ramp to control the speed and smoothness of the dissolve.
Mix the dissolving effect with other effects, such as smoke or fire simulations, for more complex and realistic results.
Conclusion:
Procedural dissolving effects in Blender opens up a world of creative possibilities. With the right techniques and a bit of experimentation, you can create visually stunning dissolving effects that enhance your animations and visual projects. Whether you’re a seasoned Blender user or just starting, these steps will help you add a touch of magic to your digital creations.